SHOP BY STYLES
Backyard Shed Plans Barn Shed Plans Chicken Coop Plans Compost bin Plans Corner Shed Plans Detached Garage Plans Dog Kennel Plans Dormer Shed Plans Firewood Shed Plans Garage Shed Plans Garden Shed Plans Generator Shed Plans Greenhouse Shed Plans Hip Roof Shed Plans Horse Barn Plans Large Shed Plans Lean To Shed Plans Loft Shed Plans Low Income Housing Plans Metric Garden Sheds Modern Shed Plans Porch Shed Plans Run In Shed Plans Saltbox Shed Plans School Bus Shelter She Shed Plans Short Shed Plans Tiny House PlansSHOP SIZES
4x8 Shed Plans 4x10 Shed Plans 4x12 Shed Plans 6x6 Shed Plans 6x8 Shed Plans 6x10 Shed Plans 6x12 Shed Plans 8x8 Shed Plans 8x10 Shed Plans 8x12 Shed Plans 8x14 Shed Plans 8x16 Shed Plans 8x20 Shed Plans 10x10 Shed Plans 10x12 Shed Plans 10x14 Shed Plans 10x16 Shed Plans 10x18 Shed Plans 10x20 Shed Plans 10x24 Shed Plans 12x12 Shed Plans 12x14 Shed Plans 12x16 Shed Plans 12x18 Shed Plans 12x20 Shed Plans 12x24 Shed Plans 14x14 Shed Plans 14x16 Shed Plans 14x20 Shed Plans 14x24 Shed Plans 16x16 Shed Plans 16x20 Shed Plans 16x24 Shed Plans 24x24 Garage PlansSHED BUILDING VIDEOS
All Shed Building Videos Backyard Gable Shed Videos Lean To Shed VideosSHED IMPROVEMENT HOW TOO'S
Learn about Concrete, Electrical, Framing, Codes, Roofing, Solar and more!MORE SHED PAGES
Lean To Shed Ideas Office Shed Convert Shed Design Building A Shed How To Build A Home Shed Door Plans Build A Shed Ramp Eagle Scout Shed PlansHow To Build A Floor For A House
Framing A Floor Using "I" Joists
This article teaches you how to build a floor for a house on a concrete foundation. This framing system can also be used for framing storage shed floors.This floor framing system is typical over basements and crawl spaces.
Joist spans and spacing are determined by engineering that is published by the manufacturer.
- Every floor joist manufacturer has product literature and telephone support with engineered span and spacing tables specifying typical joist spans and floor loads to help design a custom floor system.
- Lumber yards that sell floor joists will have the literature and skill necessary to help you order the proper materials to build a floor for a house.
This article will teach you how to build a floor for a house.
brief steps to framing a floor for your storage shed or house.
- Square The Sill Plate Layout On The Foundation
- Cut, Drill And Attach The Sill Plates
- Build Basement Bearing Walls, Where Necessary
- Layout The Joist Spacing On The Sill Plates
- Attach The Rim Joists
- Cut And Install The Floor Joists Between The Rim Joists
- Stairway and Balcony Openings Are Framed Using Bearing Walls Or Beams Below
- Beams In The Floor Require Joist Hangers
- Beams Under The Floor Joists Allow The Floor Joists To Go Over
- Cantilevers Allow The Floor To Be Framed Out Past The Foundation
- Sheeting The Floor With OSB Or Plywood
tools and materials
- Floor joists
- Rim Joist
- Joist Hangers
- Fasteners, (nails)
- Construction Adhesive
- 3/4" O.S.B. (Oriented Strand Board)
- Construction Pencil
- Chalk Line
- Tape Measure
step 1 Square The Sill Plate Layout On The Foundation
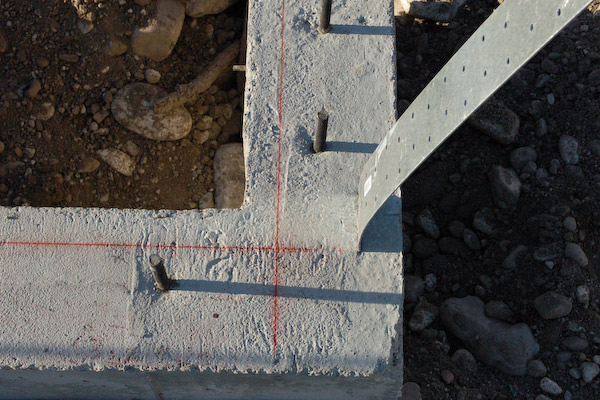
The first step to building a floor for a house is to attach the sill plates to the foundation of the house. The foundation will have bolts set into the concrete along the perimeter. You will use these bolts to attach the sill plate to the foundation. The sill plate must be square, even if the foundation was poured out of square. This will make your floor system square and hopefully keep the rest of the house framing closer to square as you go up to the roof.
Squaring a floor is done by making a "345 triangle" on the top of the foundation. The numbers stand for the lenght in feet, 3' 4' 5'. The larger the triangle the more square your floor will be. Simply double the 345 by making the triangle legs 6'-8'-10' or larger. These are the steps to square up the sill plates on a house without brick, if your house has brick you will need to add the brick thickness to the 3 1/2" measurement in from the outside of the foundation:
- DRAW THE FIRST LINE: Find the longest continuous foundation wall, measure and mark 3 1/2" in from the outside of the foundation at each end.
- Put a chalk line mark between these pencil marks. (down the entire length of the wall).
- MARK THE CORNER: Find the second longest wall that touches the first wall and measure in 3 1/2" from the outside of the foundation wall and put a mark on the chalk line. (Call this the "Corner Mark". This marks the sill plate inside corner.)
- MARK THE 3' LEG: From the Corner Mark measure down the chalk line 3' and make a mark on the chalk line. (Call this the "3 Foot Mark").
- MARK THE 4' LEG WITH AN ARC: Have someone hold the end of the tape measure on the Corner Mark and measure down the wall without a chalk line on it 4' and draw an arc with the pencil. An arc is used because we do not know where the point on the arc to make the square wall is yet. Somewhere on the arc will be the intersection that makes the two lines square.
- MARK THE 5' LEG WITH AN ARC: Have someone hold the end of the tape measure on the 3 Foot Mark and make an arc through the 4' leg arc. The intersection of the two arcs is the point you will pull the chalk line through to mark the sill plate location on the second shorter wall.
- DRAW THE SECOND LINE: Have someone hold the chalk line firmly on the Corner Mark and another person pull the other end of the line to the other end of the second wall, (the one without a line on it yet). Have a third person stand over the intersection of the two arcs and then "pull through" the arc intersection, make sure you go all the way down the second wall to fully mark the sill plate location.
After these two lines are on the foundation you will be able to easily pull measurements across the foundation to the other foundation walls and mark parallel lines for the other sill plate locations. Try to get them 3 1/2" in from the outside of the foundation. These measurements are rarely the exact same as the plans because the concrete foundations are not always square.
This image shows the chalk lines measured in 3 1/2" for the plate and 2" for brick.

step 2 Cut, Drill And Attach The Sill Plates
These are the steps to mark and drill the sill plates:
- Place the treated sill plates directly over the chalkline location they will be installed on, rest it on the bolts and then hit the plate with a hammer into the bolts so that the anchor bolts make an indent in the sill plate.
- Roll the plate over and use a 3/4" drill bit to drill a hole where the mark from the bolt is.
- After all the holes are drilled place the sill plate on the bolts and check to make sure it is lined up with the chalk line. Adjust with the drill as necessary until it is perfect.
These sill plates are held back from the edge of the foundation so bricks can be installed.

step 3 Build Basement Bearing Walls - Where Necessary
After you have the sill plate installed you will be able to measure the exact height of the basement bearing walls or the beams used for bearing in crawl spaces. Either way the process to find the height of the bearing plate on the interior lower walls is about the same. Measuring from the basement floor to the top of the sill plates better insures a flat floor because basement concrete slabs are never perfectly level but your wood floor can be by following these steps:
- Find the location where the bearing wall meets the perimeter walls and mark the exact location on the sill plates that you have just bolted down.
- Place a nail in the sill plate in approximately the center of the basement wall location. Repeat this for the other end of the wall as well.
- Pull a nylon string line between the nails, it will be directly over the new basement wall. Make the string line very, very tight. There can be absolutely no sag in it.
- Layout the wall location on the basement floor and mark it with a chalk line.
- Stack three 2x4 blocks on the concrete floor at each stud location and measure the stud length for each stud along the wall by measuring from the string line down to the top of the blocks, (1 block for the sill plate and 2 blocks for the top plate)
- Cut the studs to length making sure to keep them in their proper order.
- Frame the basement bearing wall.
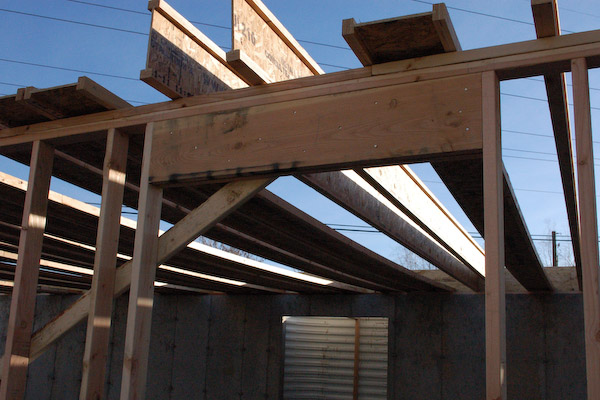
This is a image of a basement stairwell wall and main bearing wall. Notice the wood blocks next to each wall stud. Notice how the plate is 1/2" in from the outside of the foundation at the corner but farther away it is flush with the outside of the foundation. This foundation is out of square.

step 4 Layout The Joist Spacing On The Sill Plates
Floor joists are typically spaced 16" o.c. or 12" o.c. This article will assume 16" o.c. Start at one corner of the foundation and layout the joists 16" o.c. If you hook your tape measure on the sill plate that runs parallel to the joist layout then you will find 16" on the tape measure and subtract half the thickness of the joist to mark the edge of the floor joist. So for a 2" wide flange on a joist you will find 16" on the tape measure and go back to 15" to make the mark. Continue this on all the marks along the sill plate.
Mark the opposite sill plate from the same end so all the floor joists are square with the foundation. Use a ladder to mark the top of the bearing wall with the same joist layout from the same side of the foundation as the two exterior walls.
step 5 Attach The Rim Joists
The rim joist is attached at the ends of the joists to keep the joists stable in the upright position and to carry the weight of the walls and roof above. The rim joist will typically sit on the edge of the sill plate.

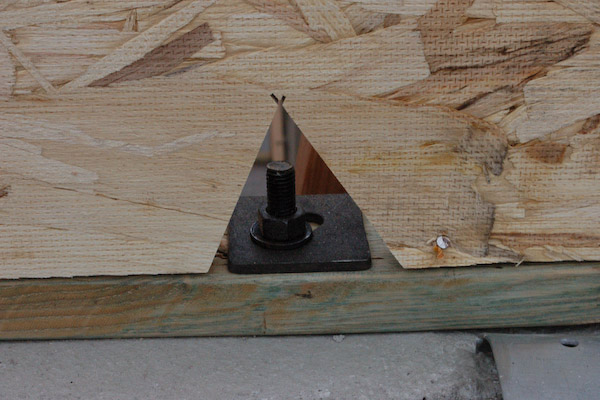
It is common to notch the rim joist over the anchor bolts.

step 6 Cut And Install The Floor Joists Between The Rim Joists
Now you are ready to cut and install the floor joists.
- Measure the distance between the rim joists. (the lengths should be the same because you took the time to make the sill plates square and parallel to each other)
- Cut the floor joists.
- Put the floor joists on the layout marks on the sill plate.
- Nail each end of each floor joists to the sill plates according to the manufactures requirements (usually 3 -10d nails)
Floor joists attached to rim joist.

Floor joists laid out between the rim joists.

step 7 Stairway and Balcony Openings Are Framed Using Bearing Walls Or Beams Below
If there is a stairway opening you will frame the walls for it just like you did the main bearing wall. The floor joists will run to the inside of the stairway and be headed off with a rim joist on the inside side of the stairway.
Stairway opening in floor joists. Notice how the rim joist sits on the inside of the stairwell wall so the floor joists can bear on the wall. The two joists at the top of the stairs provide additional support to hold the stair stringers.

step 8 Beams In The Floor Require Joist Hangers
Sometimes you may want to have a beam holding the floor but you don't want the beam to be below the floor joists. This problem can be solved by installing a beam in the floor joist system and hanging the floor joists on the beam. Make sure to use construction adhesive in the seat of the hanger to prevent floor squeaks.
The beam is typically sized to be the same height as the floor joists.

step 9 Beams Under The Floor Joists Allow The Floor Joists To Go Over
Other times you can simply put the beam under the floor joist. This beam will get trimmers under each end to hold it up before the framing is finished.

step 10 Cantilevers Allow The Floor To Be Framed Out Past The Foundation
Cantilevers are used to extend the floor beyond the foundation. This is popular with fireplaces, breakfast nooks and bay windows. Follow the engineering specifications when determining how far the joists need to extend under the floor to allow your desired cantiliever.

step 11 Sheeting The Floor With OSB Or Plywood
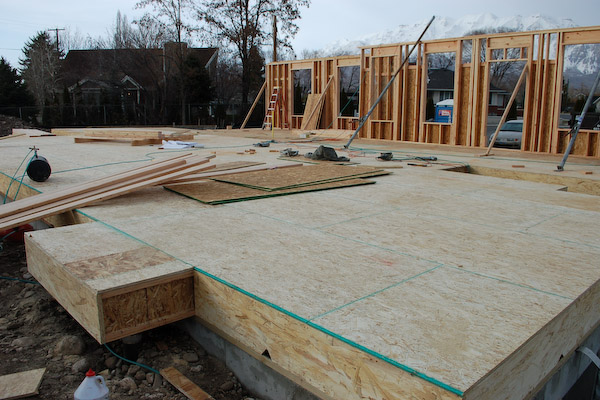
The final step in building a floor for a house is to sheet it with OSB. The OSB or plywood must be staggered like stacking bricks to give it strength. OSB floor sheeting is typically 3/4" thick and comes with a tounge and goove to give the spans between the floor joists strength.
Pick a wall to start installing the floor sheeting from, typically you will start at the same end that you laid out the floor joists from so you can start with a full or half sheet.

This is the floor sheeting around the stairwell. Notice how the rim board and the sheeting and the wall below line up perfectly. Also notice how we left the sheeting over hanging the first step so there will be a stair nosing coming off the floor. Wait until the stairs are in to cut out the sheeting over the bottom part of the stairs to make sure there is the code required 6'-8" of headroom.

Now that you have built the floor for the house you are ready to frame the exterior walls!
related articles